
My blog!
I did not mean to abandon you…it’s just, I’ve been doing Christmas-y/ Advent-y things that have occupied my time. One of them is this FISH ORNAMENT.
So, on my padre’s side of the family we draw names for Christmas presents. One of them is for this uncle, Uncle Jim.

Sooooo, in that picture we’re playing a gift exchange game. Uncle Jim had just scored a Mrs. Field’s chocolates set…and was LICKING the entire box to claim it as his own.
He’s a silly man.
But! He also likes fish, so I made him an ornament/ present-topper. And now you can make one of your own! Here is THE PATTERN for you!
I have directions as well! And pictures!
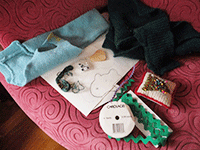
First, you’ll want to print your pattern and assemble your materials. You will need:
- The pattern
- Felt. You could just use felt you’ve purchased at a store, but I used some thrifted sweaters that I felted in the washing machine. Never fear, I meant to felt them. Personally, I prefer felted wool over the storebought stuff. But, do what floats your boat.
- Scissors. To cut things. Use the sharp ones.
- Embroidery floss. Not to be confused with dental floss.
- A Needle
- Stuffing. To stuff your fish! I didn’t picture this because I didn’t think of it at the time.
- Decorations. I used googly eyes, rickrack, and thread, but use what you have: buttons, ribbon, sequins, etc. Be creative!
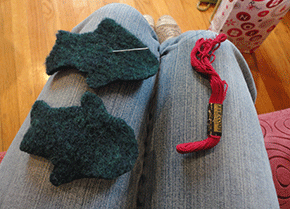
Step 2: Cut out the pattern and then cut out your felt.
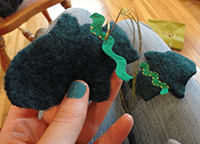
Step 3: Decorate both sides of the fish.
To be honest, it will be easier to decorate it at this stage then it is when the fish is fully assembled.
Step 4: Sew the pieces together. I used a blanket stitch. You’ll want to sew the top “body” pieces together from the bottom of the tail, around the back, over the face, all the way to under the chin of the little fish.
The belly is optional at this point. I wanted the belly because I wanted to afix the sign, and so I wanted the fins to be spaced apart so they could hold the wee sign.
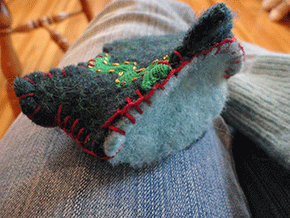
I think it would turn out fine without a belly, though. I think it would just be a thinner fish… like Nemo, the clown fish.
Either way, you’ll want to sew until you have about 2 inches left to go, and then you’ll want to stuff your little friend. Don’t forget to stuff!
Step 5: Add last-minute embelishments. I added eyes, a happy smile, and a sign that read “Merry Christ-FISH!”
Oh, and I looped a bit of embroidery floss through the the top so it could hang from a tree. Hooray!
And Merry Christmas to all!

